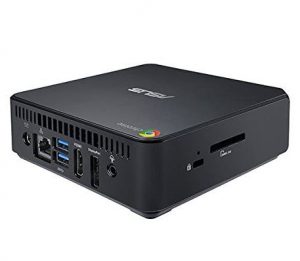
Here’s the process to convert any small form computer into a digital bulletin board. In this example I’m going to use a ASUS M400 to build a non-interactive kiosk. This process is the same for Lenovo, Dell, HP and ASUS ChromeBox. These little guys are inexpensive and all you have to do is remove the factory firmware and install Linux. The reason we installed Linux on the ASUS M400 was because it allowed us to have the most hands off experience day in and day out. We’ve been running 3 digital display boards with the following configuration without any issues for roughly 2 years now. Yes the Chrome OS has a Kiosk mode however it required baby sitting upon boot up and wasn’t as easy to manipulate as Linux for the customization we needed.
Features
- Display website in full screen on boot.
- Using WordPress you can build a modular splash page and customize feeds etc however you like.
- Custom loading image upon boot
- Wifi or Hardwired
- Remote management

What You’ll Need
- ASUS M400 or any computer you can install Linux on.
- TV or monitor to accept the video.
- HDMI Cable
- Internet connection LAN/WIFI (if using local web server for display data)

Step 1: Prepare the ASUS Chromebox for New Firmware
First you need to disable firmware write protect. With the ASUS unit powered down and unplugged:
- Remove the 4 rubber feet from bottom of unit
- Remove the 4 screws located beneath the rubber feet
- Take off the bottom cover
- Remove write-protect screw as seen in the image to your right for ASUS/HP/DELL, ACER and Lenovo units.
Now you need to place the ChromeBox in developer mode to disable verified boot mode.
With the device powered off:
- Insert a paperclip into the hole left of the SD card slot and press the recovery button
- Power on the device, then remove the paper clip
- When greeted with the recovery screen, press [CTRL-D] to enter developer mode
- Press the recovery button (with paperclip) to confirm.
- Since we’re using this unit in standalone mode, not dual boot, you do not need to perform a factory reset as mentioned in other guides online.
Step 2: Install New Boot Firmware
- Now we will use Kodi to install custom coreboot firmware.
- Power on and boot to ChromeOS. DO NOT LOG IN TO ChromeOS, but do ensure a network connection is set up
- Hit [CTRL+ALT+F2] to get to command prompt ([CTRL+ALT]+left arrow] for ChromeOS keyboards)
- Login with user chronos (no password required)
- Download and run the setup script using the following command (then hit enter):
[code]curl -L -O https://mrchromebox.tech/setup-kodi.sh && sudo bash setup-kodi.sh[/code]
You’ll now see the options below, choose “6” Install/Update: Custom coreboot firmware.

Step 3: Install Operating System (Linux)
Now you need to make a USB stick debian installer with 8.1 and installed minimal, and add jwm (a lightweight window manager) and requirements (X, etc) and chrome.
Make USB installer for debian: Download UNetbootin, which allows one to create a bootable USB installation media for almost any Linux distribution.
Install on the unit by inserting USB into the unit and booting up, follow on screen prompts.
Now install Chrome browser:
[code]wget https://dl.google.com/linux/direct/google-chrome-stable_current_amd64.deb
sudo dpkg -i google-chrome-stable_current_amd64.deb[/code]
Step 4: Set up Networking
In /etc/network/interfaces:
[code]
source /etc/network/interfaces.d/*
auto lo
iface lo inet loopback
allow-hotplug eth0
iface eth0 inet dhcp
allow-hotplug wlan0
iface wlan0 inet dhcp
wpa-conf /etc/wpa_supplicant/wpa_supplicant.conf
[/code]
and /etc/wpa_supplicant/wpa_supplicant.conf:
[code]
ctrl_interface=/var/run/wpa_supplicant
ctrl_interface_group=netdev
ap_scan=1
fast_reauth=1
eapol_version=1
network={
ssid="YourSSID"
psk="the top secret password"
priority=5
}
[/code]
Step 5: Configure JWM with /home/kiosk/.jwmrc
Install JWM.
Added StartCommand to launch a terminal with bash executing the /home/kiosk/bin/kiosk script that waits for a network interface to come up and launch chrome in kiosk mode.
<StartupCommand>xterm -e /bin/bash /home/kiosk/bin/kiosk</StartupCommand>
[code]
# Try and ensure the screen doesn’t sleep
sleep 1
xset s off
sleep 1
xset -dpms
ip_cmd="/sbin/ifconfig";
echo "Preparing to start Kiosk…";
echo "Waiting for IP address…";
eval $ip_cmd | grep "inet addr:10\.247\.\(89\|91\)" > /dev/null 2>&1;
ip_info=$?;
while [ "$ip_info" == 1 ]; do
sleep 5;
echo "Waiting for IP address…";
eval $ip_cmd | grep "inet addr:10\.247\.\(89\|91\)" > /dev/null 2>&1;
ip_info=$?;
done
echo "Launching Chrome Kiosk…";
/usr/bin/google-chrome-stable –incognito –kiosk http://10.247.89.22/kiosk2
[/code]
Added a background image to desktop so it looks prettier while you wait for network using nitrogen (apt-get install nitrogen):
[code]
/home/kiosk/.jwmrc:
<Desktops width="2" height="1"></pre>
<pre><Background type="command">nitrogen –restore</Background></pre>
</Desktops>
<pre>
/home/kiosk/.config/nitrogen/nitrogen.cfg:
[geometry]
posx=734
posy=118
sizex=450
sizey=500
[nitrogen]
view=icon
icon_caps=false
dirs=/home/kiosk/Pictures;
/home/kiosk/.config/nitrogen/bg-saved.cfg:
[:0.0]
file=/home/kiosk/Pictures/MSFA.jpg
mode=4
bgcolor=#000000
[/code]
.jwmrc may also be able to esetroot with a startup command vs using nitrogen: https://lists.debian.org/debian-user/2014/01/msg00365.html
[code]
<StartupCommand>
Esetroot -m /usr/share/wallpapers/Grass/contents/images/1280×1024.jpg
</StartupCommand>
[/code]
Now use Xorg -configure to generate a xorg.conf.new and copy to /etc/X11/xorg.conf and edit for screen resolution to be 1920×1080:
[code]
Section "Screen"
Identifier "Screen0"
Device "Card0"
Monitor "Monitor0"
SubSection "Display"
Viewport 0 0
Modes "1920×1080"
Depth 24
EndSubSection
EndSection
[/code]
Also set it to auto-login the kiosk user to tty1 via /etc/systemd/system/[email protected]/override.conf:
[code]
[Service]
ExecStart=
ExecStart=-/sbin/agetty –autologin kiosk –noclear %I $TERM
[/code]
For bash I startx if logged in on tty1 via /home/kiosk/.profile:
[code]
# the default umask is set in /etc/profile; for setting the umask
# for ssh logins, install and configure the libpam-umask package.
#umask 022
# if running bash
if [ -n "$BASH_VERSION" ]; then
# include .bashrc if it exists
if [ -f "$HOME/.bashrc" ]; then
. "$HOME/.bashrc"
fi
fi
# set PATH so it includes user’s private bin if it exists
if [ -d "$HOME/bin" ] ; then
PATH="$HOME/bin:$PATH"
fi
[[ $(tty) == "/dev/tty1" ]] && startx # if on tty1 (auto login from system) then jump to gui environment
[/code]